

Learning How to Use a Sluice Box
Once you can run a gold pan with confidence, the next tool to learn is the sluice box. Knowing how to use a sluice box the right way lets you run a lot more gravel in a day than you ever could with a pan alone.
A sluice is simple. There are no moving parts. But a sluice set up wrong will wash your gold right back into the creek, and you may never know it happened.
This guide covers how a sluice works, the gear you need, setup, angle and water flow, cleanup, and where you can legally run one.
Is your sluice catching gold, or just moving dirt?
How a Sluice Box Works
Gold is heavy. The U.S. Geological Survey notes that natural gold runs about 16 to 18 in specific gravity, while the waste rock around it runs about 2.5. That difference is what lets a pan, a rocker, or a sluice box separate gold from sand and gravel.
A sluice is a channel with riffles across the bottom. You set it in moving water and feed gravel into the top. As Keene Engineering explains, the lighter gravel is carried down the box and out the end, while the gold, black sand, and other heavy material drop to the bottom and get trapped by the riffles.
The matting under the riffles holds the fine gold, and black matting makes it easy to spot gold while you work.
What You Need to Sluice
A basic hand sluicing setup looks like this:
- A sluice box with riffles and matting.
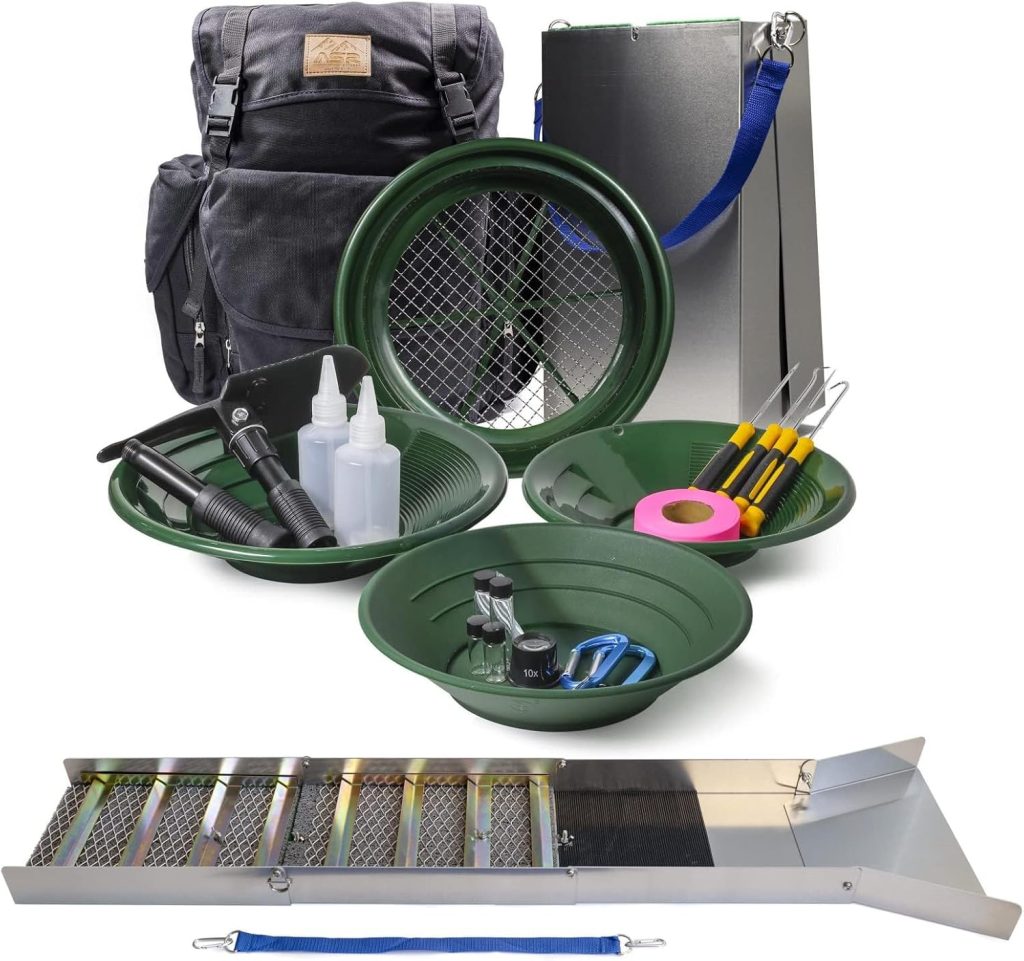
- A classifier screen for a 5-gallon bucket. The ASR Outdoor 11pc Gold Panning Kit has 1/2 inch and 1/8 inch screens that fit one.
- Two or three buckets and a sturdy shovel.
- A gold pan to pan out your concentrates.
- A snuffer bottle and vials for the fine gold at the end.
If you want everything in one package, the ASR Outdoor 24pc Deluxe 50 inch Aluminum Folding Sluice Box Kit in my shop comes with the folding sluice (matting already installed), a 1/2 inch bucket classifier, three pans, two snuffer bottles, vials, a folding pick and shovel, and a 30L backpack.
How to Use a Sluice Box Step by Step
Step 1: Pick the Right Spot
Find gold-bearing gravel first, then find a place nearby to set the box. Keene recommends a spot where the current is moving quite swiftly, with the box set right in the current so it fills with water almost to the top.
A spot where the creek has a small drop works well. The top of the box sits in fast water, and the end spills out freely instead of sitting in a slow pool.
Brace the box with rocks if it shifts, and put a flat rock across the top so it is still there when you come back with the next bucket.
Step 2: Set the Angle and Water Flow
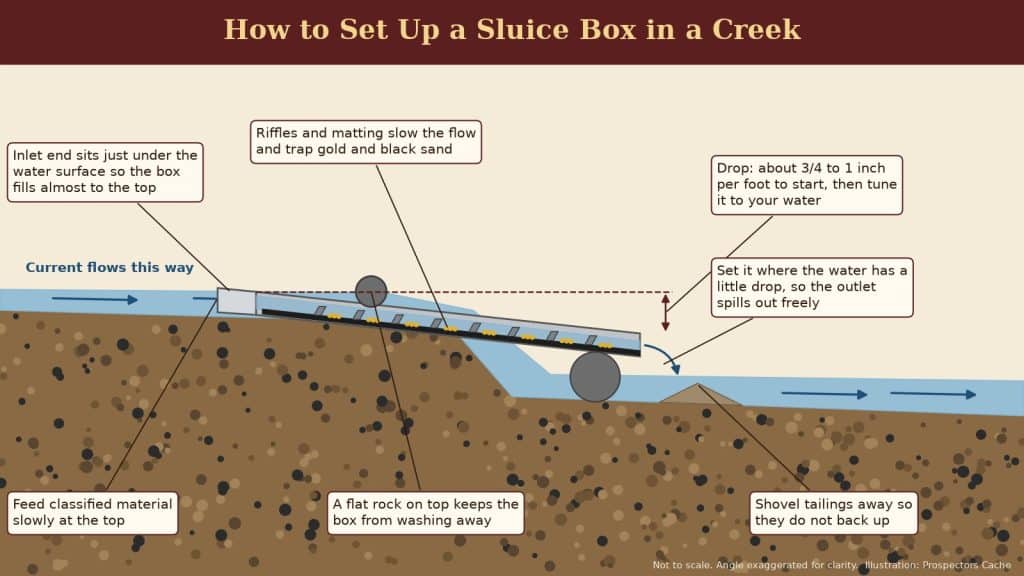
The angle and the water flow work together. In its equipment instructions, Keene Engineering puts a normal sluice tilt at about 3/4 inch per running foot, or about 3 inches over a 4 foot box. In a GPAA forum discussion, a longtime member calls about 1 inch per foot a starting point: more water means less slope, and less water means more slope.
Keene also gives the two signs to watch for:
- Not enough angle: the box loads up and the riffles fill with excess material.
- Too much angle: material moves too fast and the riffles run too clean, and that means you are losing gold.
Keep the box level from side to side so material does not pile up along one wall. Tune it with a few test scoops before you feed it real paydirt.
Step 3: Classify Your Material
Big rocks cause trouble in a sluice. Keene says that a 1/4 inch classifier screen used to prescreen material can save a lot of time, and a GPAA member in that same discussion classifies everything to 1/2 inch before running it. Check the oversize rocks for nuggets before you toss them.
Step 4: Feed the Sluice Slowly
Do not dump a full bucket in at once. Feed the material into the upper end a little at a time.
Keene gives the best rule I know for this: if you cannot see the top crest of every riffle at all times, you are feeding too fast. Back off. When the riffles overload, new gold washes right over the packed material and out the end of the box (Keene Engineering).
Step 5: Tend the Box While It Runs
Flick out any larger rocks that lodge in the riffles. A rock sitting there causes a washout that can carry concentrates out the end of the box.
Shovel away the tailings that build up at the discharge end, or they back up and bury your lower riffles.
Step 6: Clean Up the Sluice
Keene’s rule is to clean up when the black sand behind a riffle reaches more than halfway down to the next riffle. To do it right:
- Lift the box out of the current and keep it as level as possible.
- Remove the riffle tray and screen without shaking off the gravel stuck to them.
- Roll up the matting inside a bucket and rinse out all the concentrate.
- Rinse the trough, the riffles, and the screen into the bucket too.
Gold works its way under the matting, so do not skip the trough.
Step 7: Pan Out the Concentrates
Everything you ran all day is now in that bucket, so slow down. Pan it out carefully, the same way I cover in How to Pan for Gold: A Beginner’s Step-by-Step Guide. If you end up with a lot of black sand, my process for getting gold out of black sand with no mercury picks up where the pan leaves off.
Where Can You Legally Use a Sluice Box?
Before you use a sluice box anywhere, find out who owns or manages the land. Federal, state, and private land all have different rules.
BLM Land
Under federal BLM rules, “casual use” generally includes hand panning and non-motorized sluicing. It does not include mechanized earth-moving equipment, chemicals, or explosives (43 CFR 3809.5). BLM also says collecting on an existing mining claim is prohibited without the claim holder’s permission (BLM: Can I Keep This?). You can look up claims in the BLM Mineral and Land Records System.
National Forests
Forest Service mining rules say a notice of intent is not required for low-impact prospecting such as gold panning, metal detecting, and non-motorized hand sluicing that will not cause significant surface disturbance (36 CFR 228.4). Check with the local ranger district for closures and special rules.
State Rules and Parks
States add their own rules for working in streams. Washington is a good example. Its Gold and Fish pamphlet serves as the permit for the methods it covers. It limits a sluice to 25 percent of the wetted width of the stream where it sits, and it requires you to fill excavations and level tailings piles before you move on. Motorized equipment needs a separate permit.
National Park Service rules generally prohibit disturbing or removing mineral resources in park areas (36 CFR 2.1). On private land, get the owner’s permission first, in writing if you can.
Know whose ground you are on before the shovel goes in.
Gear From Prospectors Cache
I keep prospecting and detecting gear in my Etsy shop, ProspectorsCacheShop, and in my Prospectors Cache eBay store. If you want to see this kind of gear used in the field, check out my Prospectors Cache YouTube channel.
Final Thoughts
Learning how to use a sluice box is not complicated, but the setup decides whether it catches gold. Take your time getting it right the first few trips.
Set it in good current. Start around 3/4 to 1 inch of drop per foot and tune it to the water. Classify your material. Feed it slowly and keep every riffle crest showing. Clean up carefully, under the matting too.
Check the land rules every time. When you are ready to move more material, the next steps are a highbanker or a dredge, and I cover dredging in Steps to Success in Gold Dredging.
Learn the sluice well, and it will pay you back.
Sources
- U.S. Geological Survey: Prospecting for Gold in the United States
- Keene Engineering: Sluicing 101
- Keene Engineering: equipment instructions, sluice box adjustment and cleaning (PDF)
- Gold Prospectors Association of America: Tuning Your Sluice (Knowledge Base discussion)
- 43 CFR § 3809.5: definition of casual use (Cornell LII)
- Bureau of Land Management: Can I Keep This?
- BLM Mineral and Land Records System (MLRS)
- 36 CFR § 228.4: Plan of operations, notice of intent (Cornell LII)
- Washington Department of Fish and Wildlife: Gold and Fish, Rules for Mineral Prospecting and Placer Mining (2021)
- 36 CFR § 2.1: Preservation of natural, cultural and archeological resources (Cornell LII)
Written by Tom Ashworth
Prospectors Cache